Choosing a microscope camera can be more complicated than choosing the microscope itself.
Two cameras may both be advertised as 12 MP, yet produce very different results when connected to the same microscope. A 4K camera may provide an excellent live image on a monitor but may not be the best solution for scientific low-light imaging. A high-resolution sensor may capture large still images while providing a lower frame rate at full resolution.
The reason is simple:
Megapixels are only one part of microscope camera performance.
To choose the right camera, you need to consider the complete imaging system, including:
Sensor size
Pixel size
Resolution
Frame rate
Sensitivity
Dynamic range
Camera interface
Microscope optics
Illumination
Software requirements
Intended application
This guide explains each factor and shows how they work together.
1. Start with the Application
Before comparing specifications, define what the camera will actually be used for.
A camera for PCB inspection has very different priorities from a camera for fluorescence microscopy.
For example:
Electronics and PCB Inspection
Typical priorities include:
Smooth live video
Low latency
High frame rate
Good color reproduction
HDMI monitor output
Measurement capability
Comfortable real-time operation
Biological Microscopy
Important factors may include:
Accurate color reproduction
Resolution
Sensor sensitivity
Software compatibility
Measurement and documentation
Image capture through a trinocular microscope
Fluorescence Microscopy
The priorities shift toward:
High sensitivity
Low read noise
Longer exposure capability
Large pixels
Cooling
High dynamic range
Education and Demonstration
Useful features may include:
HDMI output
Simple operation
4K display
Image and video recording
Multiple display options
Easy connection to a classroom monitor
Industrial Measurement
Important factors may include:
Stable image geometry
Calibration
Measurement software
High resolution
Fast live preview
Reliable computer connectivity
The first question should therefore not be:
“How many megapixels do I need?”
It should be:
“What do I need the camera to do?”
2. Microscope Camera Resolution Explained
Camera resolution is usually specified in megapixels.
Examples include:
2 MP
5 MP
8 MP
12 MP
20 MP
48 MP
A megapixel represents approximately one million image pixels.
For example, an image measuring approximately 4000 × 3000 pixels contains roughly 12 million pixels, or 12 MP.
Higher resolution can provide several advantages:
Larger captured images
More pixels for documentation
Greater flexibility when cropping
Better digital measurement sampling
More detail when the optical system can actually resolve it
However, there is an important limitation.
More Megapixels Do Not Automatically Mean More Optical Detail
The microscope must first resolve the detail optically.
If the optical system cannot distinguish two microscopic structures, adding more camera pixels will not make those structures suddenly become visible.
Instead, the camera may simply sample the same optical information with more pixels.
This is why microscope imaging should be viewed as a complete chain:
Specimen → Objective → Microscope optics → Camera adapter → Sensor → Software or display
The weakest part of that chain can limit the final result.
3. Optical Resolution vs Camera Resolution
This distinction is extremely important.
Optical Resolution
Optical resolution describes the microscope's ability to distinguish two closely spaced points as separate structures.
It is strongly influenced by factors such as:
Objective numerical aperture
Illumination wavelength
Optical quality
Condenser configuration
Sample preparation
Imaging technique
Camera Resolution
Camera resolution describes how many pixels are used to record the image.
A camera should provide enough sampling to preserve the detail delivered by the microscope.
But once the optical image is sufficiently sampled, adding additional pixels may produce larger files without providing proportional increases in useful information.
This phenomenon is one reason a well-matched lower-megapixel camera can sometimes outperform a poorly matched camera with a much higher advertised resolution.
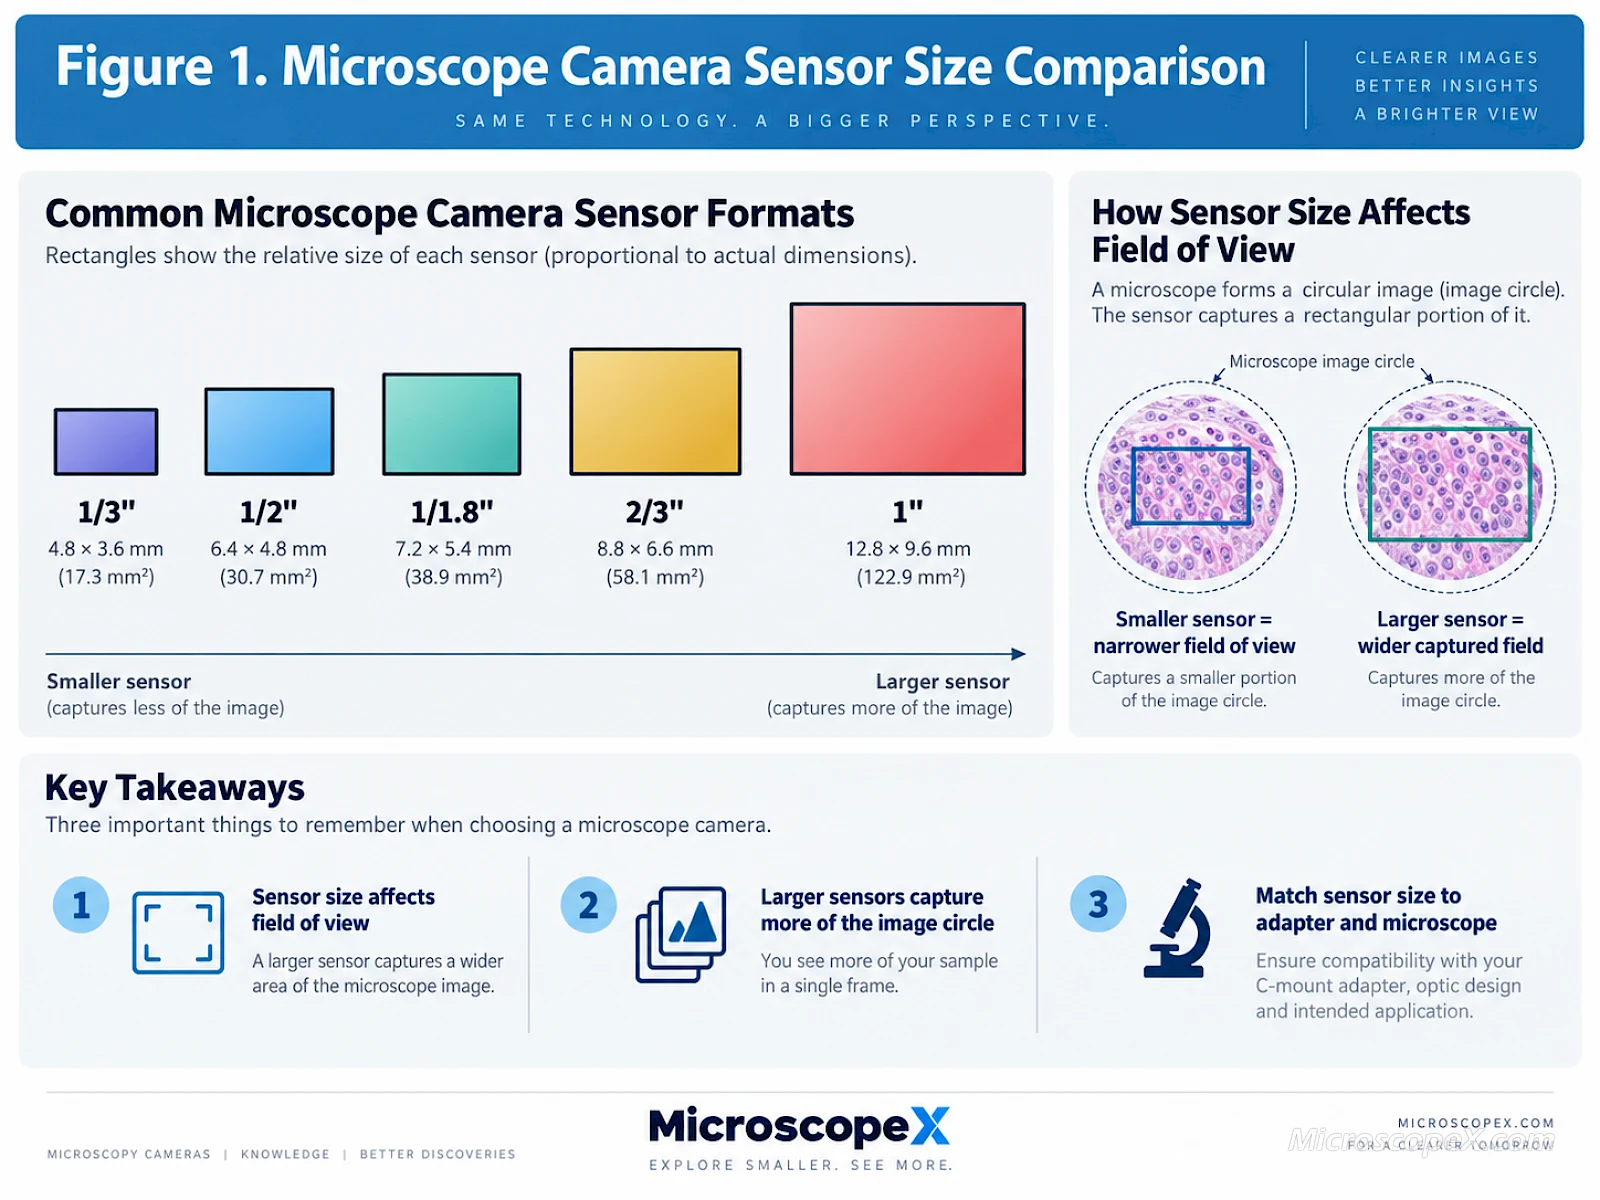
4. Sensor Size: One of the Most Important Specifications
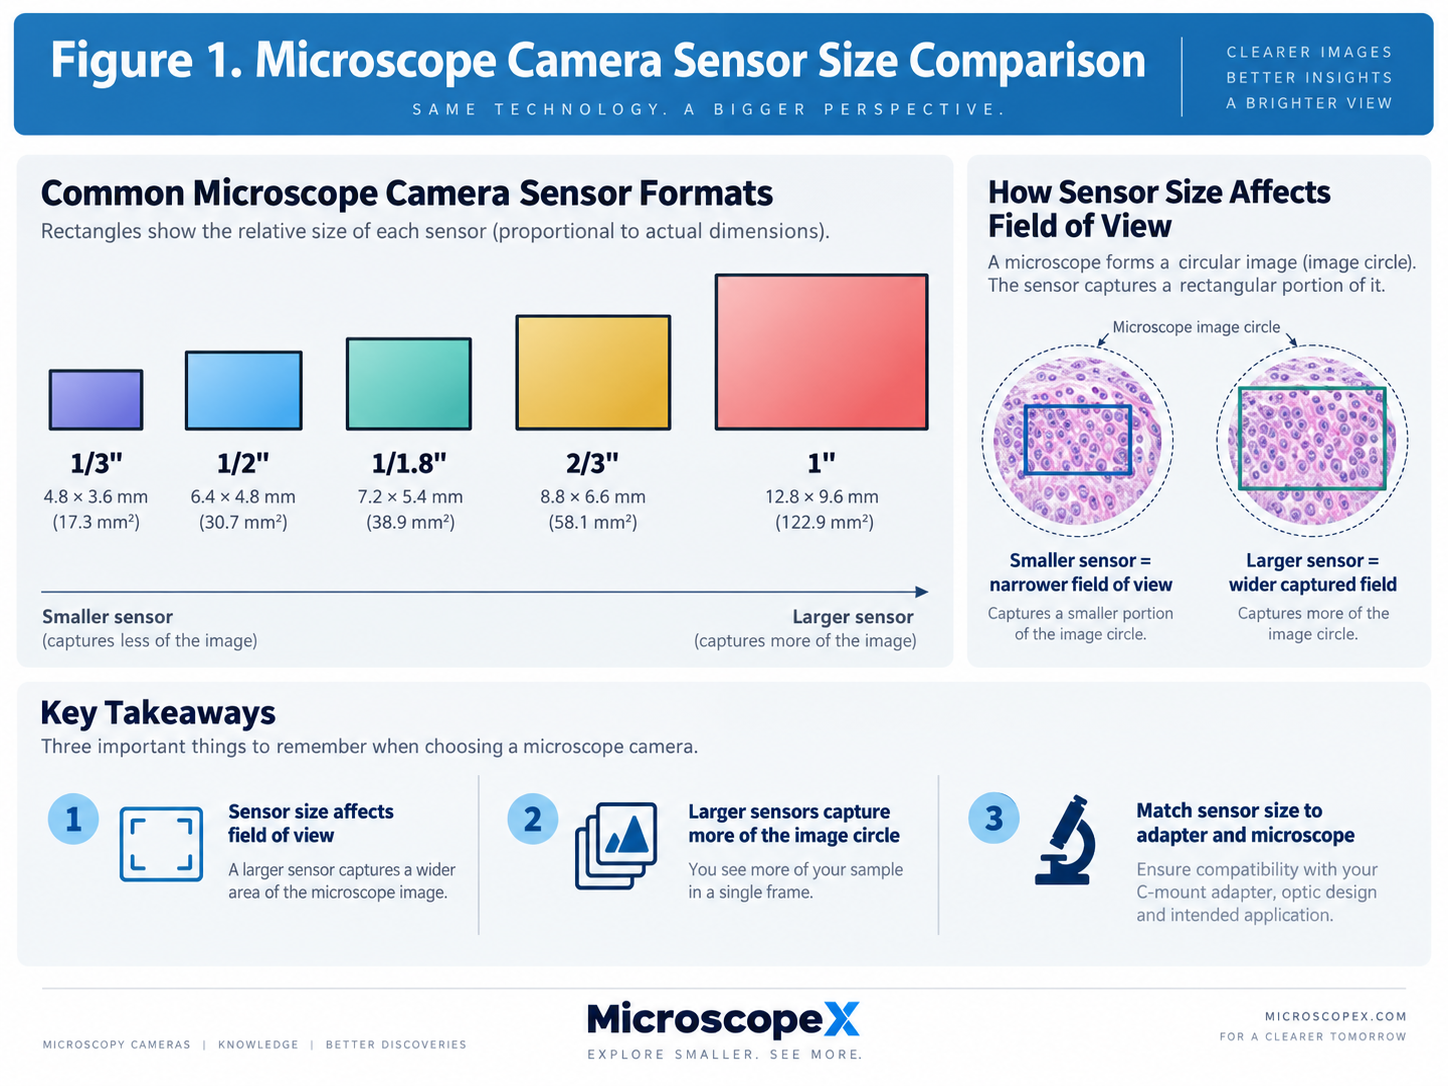
Microscope camera sensors come in many sizes.
Common formats may include:
1/3"
1/2.8"
1/2.5"
1/2"
1/1.8"
2/3"
1"
4/3"
The quoted inch designation is a traditional sensor format rather than a direct measurement of the physical diagonal, so it is best used primarily as a format classification.
What matters practically is the sensor's actual width and height.
Why Does Sensor Size Matter?
Sensor size affects several important characteristics:
Field of view
Adapter selection
Potential pixel size
Sensitivity
Camera size and cost
How much of the microscope image circle is captured
In general, a larger sensor can capture a larger area of the microscope image when the rest of the optical system remains unchanged.
This can be extremely useful when you want the camera view to more closely resemble what you see through the eyepieces.
5. Sensor Size and Field of View
Imagine connecting two cameras to the same trinocular microscope using the same 1× C-mount adapter.
One camera has a relatively small sensor.
The other has a larger sensor.
The smaller sensor captures only the central portion of the microscope's image.
The larger sensor captures a wider portion.
The result is effectively similar to cropping an image.
This means that sensor size directly influences the camera field of view.
This becomes especially important in applications such as:
PCB inspection
Large specimen documentation
Teaching
Dissection
Low-magnification stereo microscopy
If the camera field appears much narrower than the eyepiece view, the sensor and adapter combination may be responsible.
6. Pixel Size Explained
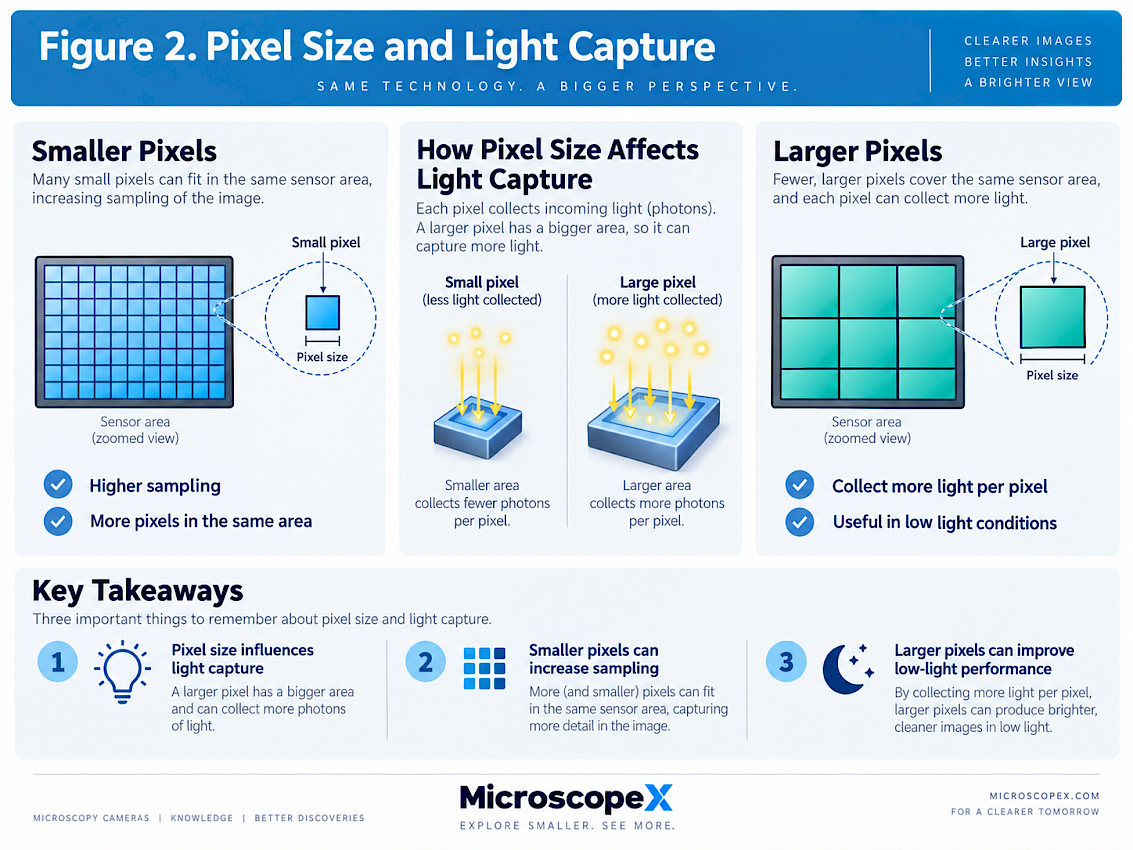
Every digital sensor is composed of individual photosensitive pixels.
Pixel size may be specified in micrometers, for example:
1.45 µm
2.0 µm
2.4 µm
3.45 µm
3.8 µm
5.86 µm
Pixel size affects how the sensor samples the optical image.
It can also influence light collection.
Smaller Pixels
Potential advantages:
More pixels can fit onto a given sensor area
High spatial sampling
High megapixel counts
Useful for well-illuminated imaging
Potential limitations:
Each individual pixel collects light over a smaller physical area
Low-light performance may become more demanding
Very small pixels may oversample the microscope image
Larger Pixels
Potential advantages:
More light can generally be collected per pixel
Often beneficial for low-light imaging
Can provide better signal characteristics in demanding applications
Potential limitations:
Fewer pixels fit onto a sensor of the same physical dimensions
Resolution specifications may appear lower
Neither large nor small pixels are automatically better.
The correct pixel size depends on the microscope's optical resolution, magnification, illumination, sensor size, and application.
7. Why a 5 MP Camera Can Sometimes Be Better Than a 20 MP Camera
This surprises many first-time buyers.
Suppose a microscope objective produces an optical image containing a certain amount of resolvable detail.
If a 5 MP sensor already samples that image adequately, increasing the camera to 20 MP may not create four times as much useful microscopic detail.
Instead, you might get:
Larger files
More storage requirements
Slower processing
Lower full-resolution frame rates
without a comparable increase in optical information.
Meanwhile, the 5 MP camera might have:
Larger pixels
Better sensitivity
Higher frame rate
Lower noise
and therefore produce a better practical imaging experience.
This is why camera selection should always consider the microscope and application rather than megapixels alone.
8. What Is Frame Rate?
Frame rate is measured in frames per second, or FPS.
For example:
15 FPS
30 FPS
60 FPS
120 FPS
Higher frame rates produce smoother live video.
This becomes especially important when:
Moving the specimen
Adjusting focus
Performing microsoldering
Manipulating components
Tracking moving organisms
Demonstrating microscopy live
Using the microscope for inspection
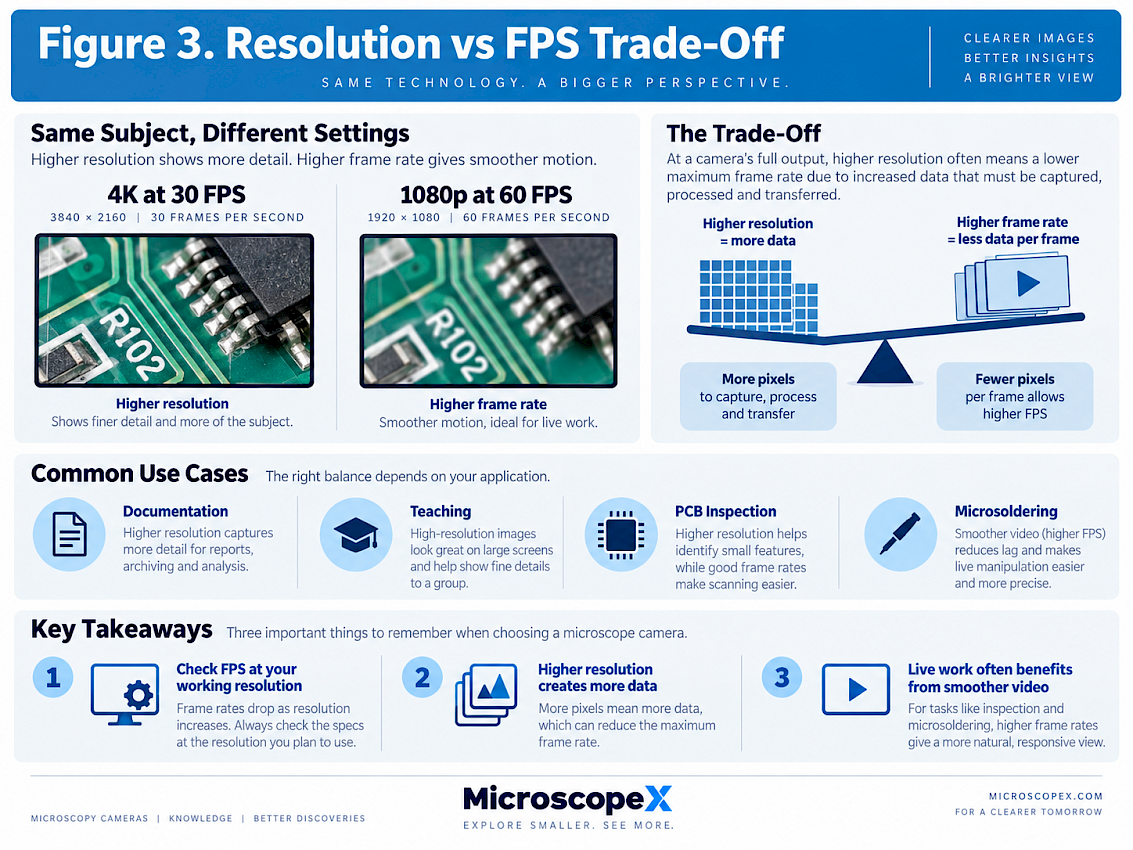
9. Resolution and FPS Are Often a Trade-Off
Many microscope cameras support several combinations of resolution and frame rate.
For example, a camera might provide:
3840 × 2160 at 30 FPS
but also:
1920 × 1080 at 60 FPS
or even higher frame rates at reduced resolution.
This is normal.
Higher-resolution frames contain more image data, which places greater demands on:
Sensor readout
Image processor
Interface bandwidth
Computer performance
Storage speed
So when comparing cameras, never look at maximum resolution and maximum FPS independently.
Ask:
What FPS does the camera provide at the resolution I will actually use?
This is especially important for live inspection.
10. 30 FPS vs 60 FPS: Which Do You Need?
For still-image documentation, a very high frame rate may not be important.
For live work, it can make a noticeable difference.
30 FPS
Usually sufficient for:
General observation
Still-image capture
Classroom presentation
Biological microscopy
Routine documentation
60 FPS or Higher
Particularly useful for:
Microsoldering
Electronics repair
Fast specimen positioning
Industrial manipulation
Real-time inspection
A smooth image reduces the feeling of delay between hand movement and what appears on the display.
For precision manual work, this can be more valuable than simply increasing megapixels.
11. Camera Latency Matters Too
FPS and latency are related but not identical.
A camera can theoretically output many frames per second while still introducing noticeable delay through:
Image processing
USB transfer
Computer processing
Display processing
Network transmission
For operations performed while looking at a screen rather than through eyepieces, low latency is extremely important.
This is one reason HDMI microscope cameras are popular for electronics repair and industrial inspection.
They can provide a direct video path from the camera to the monitor without requiring a computer for basic observation.
12. HDMI Microscope Cameras
An HDMI microscope camera connects directly to a monitor, television, or compatible display.
A typical system is:
Microscope → Camera → HDMI Cable → Monitor
No computer is required for live viewing.
Depending on the camera, additional functions may include:
Image capture
Video recording
Crosshair display
Measurement
Digital zoom
Exposure adjustment
White balance
Freeze frame
TF or SD card storage
Advantages of HDMI
Simple setup
Low-latency live image
Excellent for real-time work
No computer required
Easy large-screen viewing
Convenient for teaching and demonstration
Best Applications
HDMI is especially attractive for:
PCB inspection
Microsoldering
Phone repair
Jewelry inspection
Industrial quality control
Classroom demonstration
13. USB Microscope Cameras
USB cameras transmit images to a computer.
The computer runs imaging software for live viewing, capture, measurement, analysis, and storage.
USB microscope cameras are particularly useful when the workflow depends heavily on software.
Typical capabilities can include:
Image capture
Video recording
Calibration
Geometrical measurement
Annotation
Image processing
Data management
Automated analysis
14. USB 2.0 vs USB 3.0
The interface can significantly affect camera performance.
USB 2.0
USB 2.0 cameras remain useful for applications where extremely high bandwidth is not required.
They can be suitable for:
Routine biological imaging
Educational use
Still-image capture
Lower-resolution sensors
Cost-sensitive systems
USB 3.0
USB 3.0 provides substantially more data-transfer bandwidth.
This becomes useful when transmitting:
High-resolution images
High-frame-rate video
Large sensor data
Real-time industrial imaging
For demanding digital microscopy, USB 3.0 is often preferable when computer-based imaging is required.
15. HDMI vs USB: Which Should You Choose?
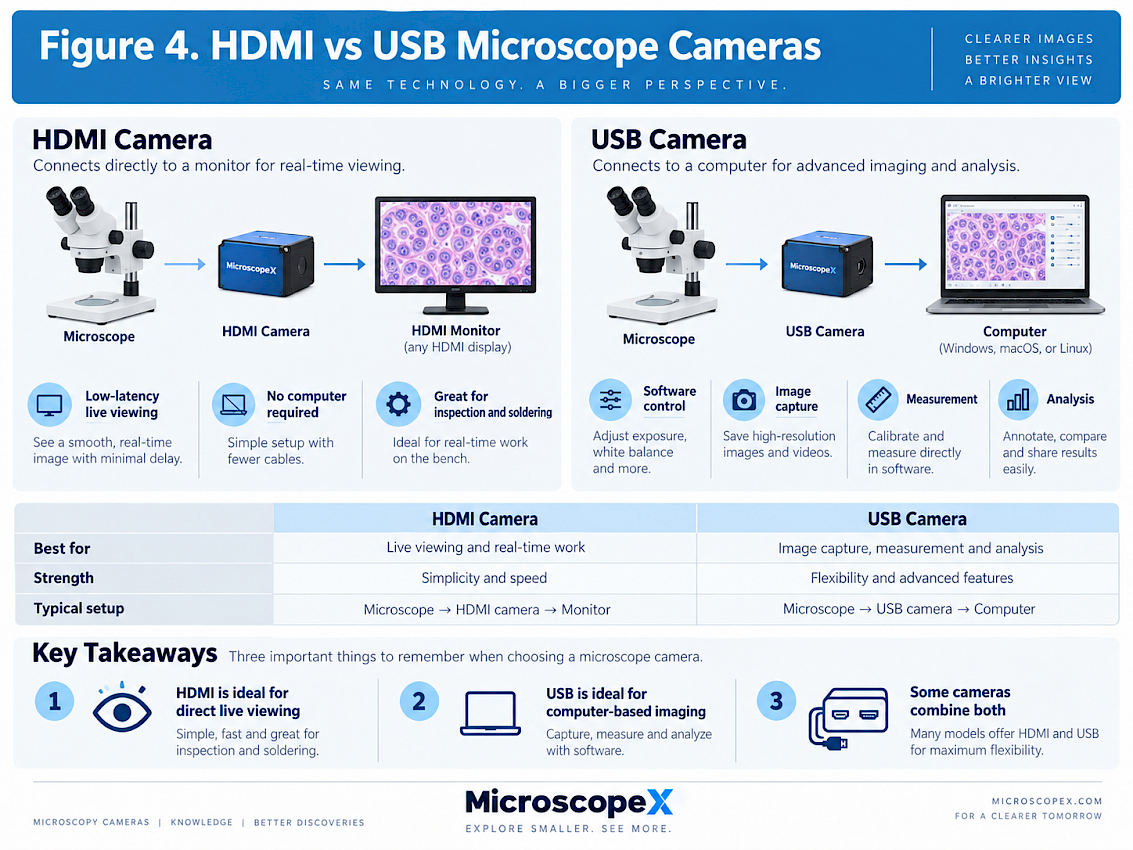
A simple rule is:
Choose HDMI when your priority is live viewing.
Examples:
Soldering
Assembly
Inspection
Classroom display
Standalone monitor operation
Choose USB when your priority is computer-based imaging.
Examples:
Measurements
Research documentation
Image analysis
Data storage
Computer-controlled workflows
But you do not necessarily have to choose only one.
Many modern microscope cameras support multiple interfaces.
A camera may provide combinations such as:
HDMI + USB
HDMI + USB3.0
HDMI + LAN
HDMI + Wi-Fi
HDMI + USB + LAN + Wi-Fi
Multi-interface cameras can be useful when one microscope must support both direct viewing and computer-based analysis.
16. What About Wi-Fi Microscope Cameras?
Wi-Fi cameras can transmit microscope images wirelessly to compatible computers, tablets, or mobile devices.
Their advantages can include:
Reduced cabling
Flexible display positioning
Multiple-device viewing
Convenient teaching applications
However, wireless imaging is not automatically ideal for every application.
For precision live manipulation, wired HDMI or high-speed USB may provide more predictable performance.
Wi-Fi is particularly useful when convenience and flexible viewing are more important than minimum latency.
17. What Is a C-Mount Microscope Camera?
C-mount is one of the most common lens and camera mounting standards used in microscopy and industrial imaging.
A C-mount camera can be connected to a microscope through a compatible:
Trinocular photo port
Optical relay adapter
The mechanical mount itself is standardized, but this does not mean every C-mount camera automatically produces an ideal field of view on every microscope.
The adapter optics still need to be matched to the camera sensor and microscope.
18. Why the C-Mount Adapter Matters
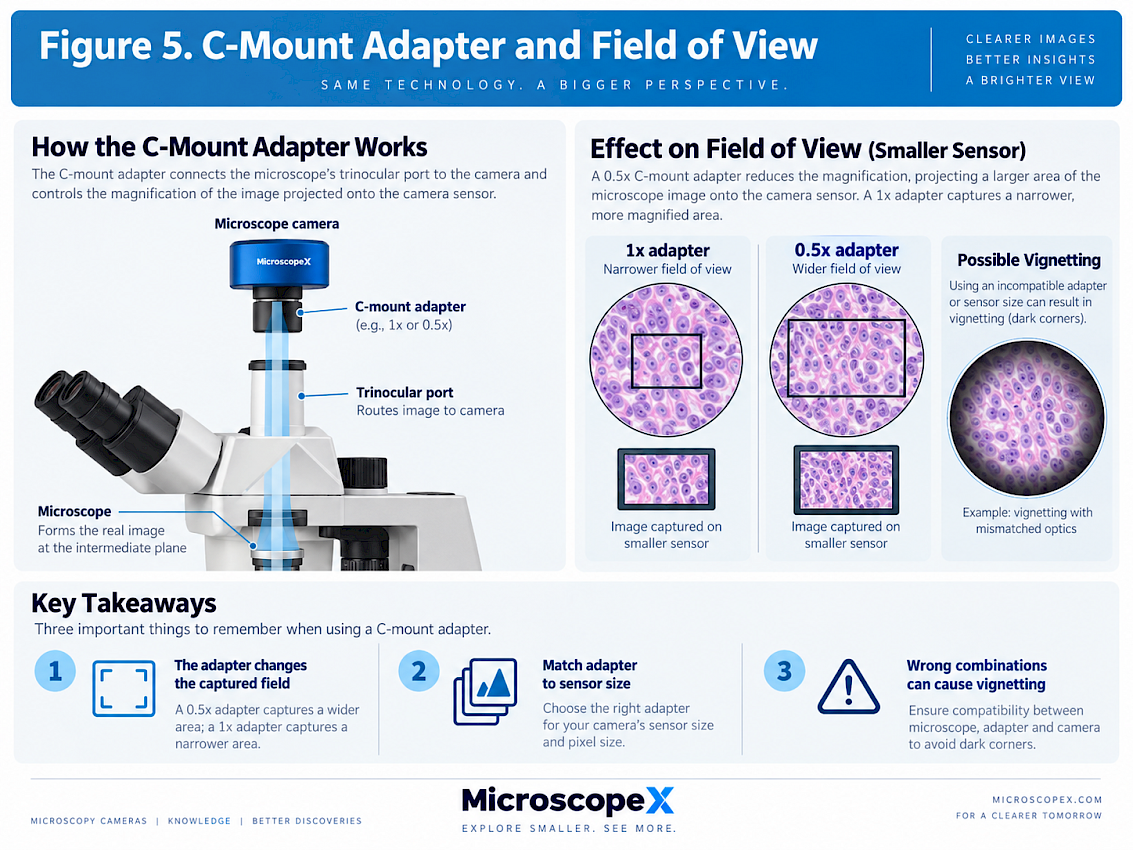
A common mistake is to spend considerable time choosing a camera while treating the adapter as an unimportant accessory.
The adapter can dramatically affect the final image.
Common adapter magnifications may include:
0.35×
0.5×
0.63×
0.75×
1×
The correct choice depends largely on the sensor size and microscope optical system.
Reduced-Magnification Adapters
Adapters such as 0.5× reduce the intermediate image before it reaches the camera.
This helps a smaller sensor capture a wider field of view.
1× Adapters
A 1× adapter does not provide the same optical reduction.
It may be appropriate for larger sensors or when a narrower camera field is desired.
The goal is to create a balanced combination between:
Microscope image circle + adapter magnification + sensor dimensions
19. Why Does My Camera Show a Smaller Area Than My Eyepieces?
This is one of the most common microscope camera questions.
You look through the microscope and see a wide area.
Then you switch to the computer or monitor and see only the center.
This is usually not a camera defect.
The camera sensor may simply be capturing a smaller portion of the microscope image.
Possible solutions include:
Using a larger sensor
Using a lower-magnification C-mount adapter
Selecting an adapter designed for the sensor format
The correct solution depends on the microscope and camera combination.
20. What Causes Vignetting?
Vignetting occurs when the corners or edges of an image become dark or are cut off.
In microscope-camera systems, this can happen when:
The adapter is not matched to the optical system
The sensor is too large for the available image circle
The optical relay is incorrectly configured
An incompatible adapter is used
Simply selecting the widest possible field of view is therefore not always the answer.
The imaging system must cover the sensor correctly.
21. CMOS vs CCD Microscope Cameras
Both CMOS and CCD technologies have played important roles in digital microscopy.
Modern CMOS sensors are extremely common because they can offer:
High frame rates
High resolution
Low power consumption
Flexible sensor formats
Fast readout
Excellent performance for general imaging
CCD cameras continue to exist in specialized systems and legacy applications.
However, sensor architecture alone should not determine the purchase.
Two CMOS cameras can have dramatically different performance.
Factors such as:
Sensor generation
Pixel size
Read noise
Quantum efficiency
Dynamic range
Cooling
Electronics
Image processing
can matter more than simply whether the sensor is labeled CMOS or CCD.
22. Rolling Shutter vs Global Shutter
Many CMOS cameras use a rolling shutter.
In a rolling shutter sensor, rows of the image are exposed or read at slightly different times.
This works well for many microscopy applications because specimens and cameras are usually stationary.
However, rapidly moving subjects can potentially produce distortion.
A global shutter exposes the entire sensor simultaneously.
Global shutter cameras can therefore be advantageous for:
Fast motion
Moving production lines
Machine vision
Certain measurement applications
For ordinary microscope observation, PCB inspection, biology, and documentation, rolling shutter cameras are often entirely suitable.
23. What Is Dynamic Range?
A microscope image may contain both very bright and very dark regions.
Dynamic range describes the camera's ability to record information across those different brightness levels.
Higher dynamic range can help preserve:
Bright details without saturation
Dark details without disappearing into black
Subtle contrast differences
This is particularly useful for demanding scientific and industrial samples.
Dynamic range should therefore be considered alongside resolution and sensitivity.
24. Sensitivity and Low-Light Performance
Not every microscope operates under bright illumination.
Applications such as fluorescence microscopy can involve extremely weak signals.
In these situations, camera sensitivity becomes much more important than maximum megapixel count.
Important factors may include:
Pixel size
Quantum efficiency
Read noise
Dark current
Exposure capability
Sensor cooling
A camera optimized for bright-field industrial inspection may therefore be very different from one designed for fluorescence imaging.
25. When Do You Need a Cooled Microscope Camera?
Electronic sensors generate noise, and longer exposures can increase the contribution of dark current.
Cooling the sensor can reduce thermal noise.
This is particularly useful when:
Exposure times are long
Fluorescence signals are weak
Light levels are very low
Quantitative imaging is required
Signal-to-noise ratio is critical
For bright-field microscopy or strongly illuminated industrial inspection, cooling is often unnecessary.
For low-light fluorescence and scientific imaging, however, it can be highly valuable.
26. Color vs Monochrome Cameras
Most general-purpose microscope cameras are color cameras.
They are ideal for:
Histology
Education
Industrial inspection
PCB imaging
Documentation
Materials inspection
General microscopy
Monochrome cameras are often preferred in specialized scientific imaging because removing the color filter array can improve light efficiency and spatial sampling.
They are particularly relevant to:
Fluorescence microscopy
Quantitative imaging
Low-light applications
Multi-channel scientific imaging
Again, neither is universally better.
The correct choice depends on the application.
27. 1080p vs 4K Microscope Cameras
A 1080p image typically contains approximately:
1920 × 1080 pixels
A 4K UHD image typically contains:
3840 × 2160 pixels
This means 4K provides approximately four times as many display pixels as 1080p.
A 4K camera can therefore provide a visibly sharper image on a 4K monitor, especially when displaying fine specimen details.
However, 4K does not automatically improve the microscope's optical resolution.
The microscope still needs to deliver sufficient detail to the sensor.
28. When Is 4K Particularly Useful?
4K can be extremely useful for:
PCB inspection
Soldering
Large-screen presentation
Jewelry
Industrial inspection
Teaching
High-detail documentation
A 4K display allows a large amount of image information to remain visible simultaneously.
It can be particularly impressive when working with low- to medium-magnification stereo microscopes.
29. When Is 1080p Enough?
1080p remains entirely adequate for many applications.
It may be sufficient when:
The monitor is 1080p
Maximum resolution is not critical
Smooth high-frame-rate video is more important
The microscope optical resolution is limited
Budget is a priority
A high-quality 1080p image at 60 FPS may sometimes be more useful for real-time work than a higher-resolution image with lower frame rate.
30. Camera Software Matters
For computer-connected microscope cameras, software can be just as important as hardware.
Useful functions may include:
Live preview
Still-image capture
Video recording
Exposure control
White balance
Image adjustment
Annotation
Measurement
Calibration
Image stitching
Extended depth of field
Image stacking
Data export
If measurement is important, verify that the software supports calibration for the specific microscope magnification.
31. Choosing a Camera for a Stereo Microscope
Stereo microscopes are commonly used for inspection, manipulation, and documentation.
For these applications, prioritize:
Large field of view
Smooth live image
Low latency
Good color reproduction
30–60 FPS or more for manual work
HDMI output for standalone operation
USB output if measurement is needed
Correct C-mount adapter
Good Use Cases
Electronics
PCB inspection
Microsoldering
Jewelry
Watch repair
Mechanical inspection
Entomology
Dissection
For screen-based soldering, smooth video and low latency may be more valuable than extremely high still-image resolution.
32. Choosing a Camera for a Biological Microscope
For bright-field biological microscopy, consider:
Accurate color
Good dynamic range
Appropriate sensor size
Suitable pixel size
Image resolution
Software support
Measurement capability
Correct trinocular adapter
Applications include:
Cells
Tissue sections
Blood smears
Histology
Microorganisms
Routine laboratory imaging
For standard documentation, a good-quality CMOS camera can provide excellent results.
33. Choosing a Camera for Fluorescence Microscopy
Fluorescence requires a different approach.
Prioritize:
High sensitivity
Low read noise
Low dark current
Large effective pixels
Long exposure capability
Cooling when necessary
High quantum efficiency
Monochrome imaging when appropriate
Maximum megapixel count is rarely the first consideration.
For weak fluorescence signals, sensitivity and noise performance are much more important.
34. Choosing a Camera for Industrial Measurement
Measurement applications require more than a sharp-looking image.
Consider:
Stable optical geometry
Calibration capability
Measurement software
Sensor resolution
Correct adapter
Low distortion
Repeatability
Appropriate field of view
The microscope, camera, adapter, objective, and software must operate as a calibrated system.
35. Quick Microscope Camera Selection Table
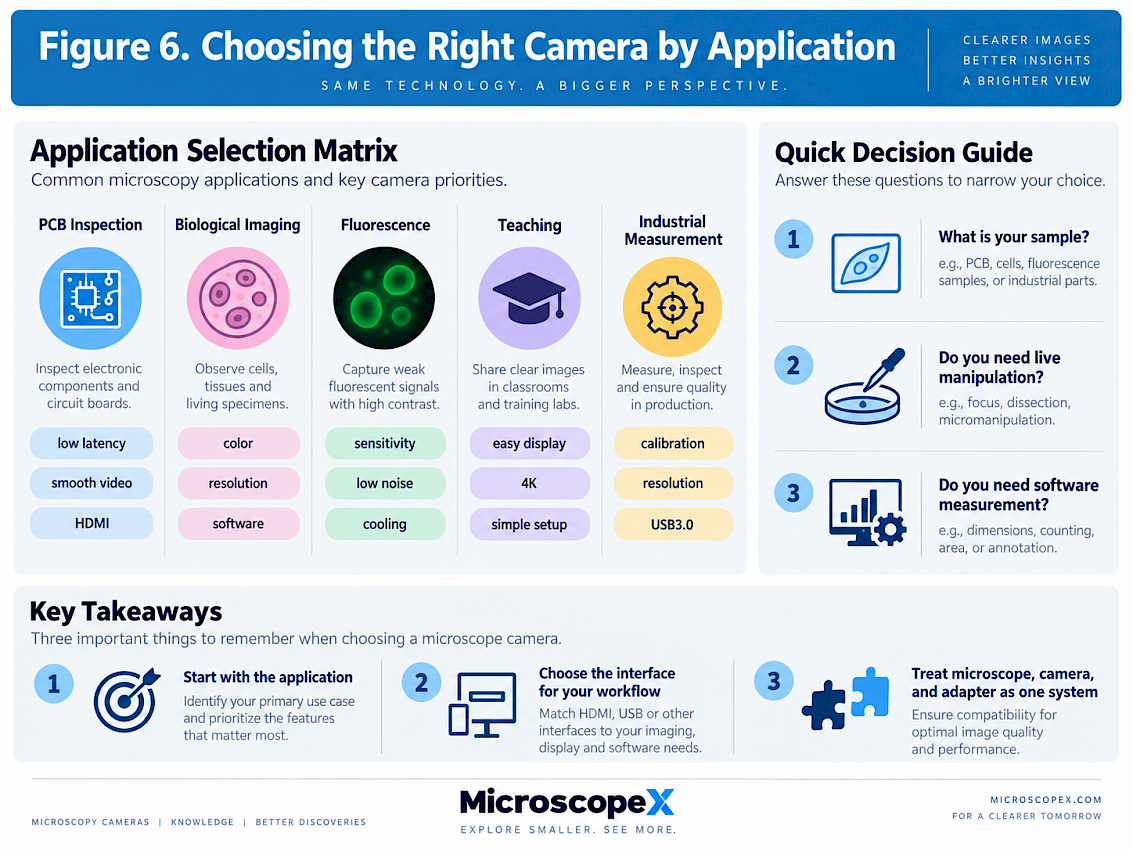
| Application | Key Priorities | Typical Interface |
|---|---|---|
| PCB inspection | FPS, low latency, field of view | HDMI / HDMI + USB |
| Microsoldering | Low latency, 60 FPS+, monitor output | HDMI |
| Biological imaging | Color, resolution, software | USB / USB3.0 |
| Fluorescence | Sensitivity, low noise, cooling | USB3.0 / scientific interface |
| Teaching | Easy display, large screen | HDMI |
| Industrial measurement | Resolution, calibration, software | USB3.0 |
| Jewelry inspection | Color, field of view, 4K display | HDMI |
| Documentation | Resolution, storage, software | USB / HDMI + USB |
36. Common Microscope Camera Buying Mistakes
Mistake 1: Choosing Only by Megapixels
A higher number does not guarantee better microscopy.
Consider sensor size, pixel size, optical resolution, FPS, and sensitivity.
Mistake 2: Ignoring Sensor Size
Sensor size has a major effect on camera field of view.
Mistake 3: Ignoring the C-Mount Adapter
The wrong adapter can produce a narrow field of view or vignetting.
Mistake 4: Comparing Maximum FPS Without Checking Resolution
Always verify the frame rate at your intended operating resolution.
Mistake 5: Choosing 4K Without a 4K Workflow
A 4K camera provides the greatest benefit when the monitor and output path also support 4K.
Mistake 6: Using an Inspection Camera for Low-Light Science
Industrial cameras and scientific cameras may have very different design priorities.
Mistake 7: Buying the Camera Separately from the Optical System
The best results come from matching:
Microscope + objective + adapter + sensor + interface + software
as one complete imaging system.
37. A Practical Camera Selection Checklist
Before buying a microscope camera, answer these questions:
1. What microscope will the camera be connected to?
Stereo, biological, metallurgical, fluorescence, inverted, polarizing, or another system?
2. What will you observe?
Cells, circuit boards, gemstones, tissues, metal surfaces, microorganisms, or other specimens?
3. Is the sample brightly illuminated or low light?
This helps determine sensitivity and cooling requirements.
4. Do you need live manipulation?
If yes, prioritize frame rate and latency.
5. Do you need direct monitor output?
If yes, consider HDMI.
6. Do you need computer measurement or analysis?
If yes, USB or USB3.0 connectivity is important.
7. Do you need 4K?
Consider both camera resolution and display resolution.
8. What sensor size do you need?
This affects the captured field of view.
9. What C-mount adapter is required?
Match the adapter to the microscope and sensor.
10. Do you need cooling?
Mainly consider cooling for long-exposure or low-light scientific imaging.
Frequently Asked Questions
How many megapixels do I need for a microscope camera?
There is no universal number.
For many microscopy applications, sensor quality, pixel size, field of view, sensitivity, and optical matching are more important than maximum megapixel count.
Choose enough resolution to adequately sample the detail provided by the microscope.
Is a 4K microscope camera better than a 1080p camera?
For large-screen live viewing and high-detail inspection, 4K can provide a significant improvement.
However, a 1080p camera with higher frame rate or better sensitivity may be preferable for certain applications.
The choice depends on whether resolution, speed, sensitivity, or cost is most important.
Is HDMI or USB better for a microscope camera?
HDMI is usually better for simple, low-latency live viewing directly on a monitor.
USB is usually better for computer-based image capture, measurement, and analysis.
Multi-interface cameras can provide both capabilities.
What sensor size is best for microscopy?
There is no single best sensor size.
Larger sensors generally provide a wider field of view with the same optical adapter, while smaller sensors can be compact and cost-effective.
The sensor should be matched to the microscope image circle and C-mount adapter.
Does a larger sensor mean better image quality?
Not automatically.
Sensor size is only one factor.
Pixel size, sensor technology, noise, dynamic range, optical matching, processing, and microscope quality also affect the final image.
What is the best microscope camera for soldering?
For microsoldering, prioritize:
Low latency
Smooth live video
High frame rate
HDMI output
Good field of view
Appropriate working magnification
Good color reproduction
A 4K HDMI camera with a high-frame-rate 1080p mode can be particularly convenient.
Do I need a cooled camera?
For normal bright-field microscopy, electronics inspection, teaching, and many industrial applications, usually not.
Cooling becomes much more valuable for long-exposure and low-light applications such as fluorescence imaging.
Can any C-mount camera fit any microscope?
Mechanical C-mount compatibility does not guarantee optical compatibility.
The camera still requires the appropriate microscope photo port and adapter, and the adapter magnification should be matched to the camera sensor.
Conclusion
Choosing the right microscope camera requires much more than comparing megapixel numbers.
A well-matched camera system balances:
Optical resolution
Sensor size
Pixel size
Resolution
Sensitivity
Dynamic range
Frame rate
Latency
Interface
C-mount adapter
Software
Application requirements
For live industrial work, smooth video and low latency may be the highest priorities.
For biological documentation, color accuracy, resolution, and software may matter more.
For fluorescence microscopy, sensitivity and low noise can be far more important than maximum resolution.
And in every case, the camera should be treated as part of the complete microscope optical system.
The best microscope camera is not the camera with the largest specification numbers. It is the camera whose sensor, optics, interface, and imaging performance are correctly matched to your microscope and application.
Find the Right Microscope Camera
MicroscopeX offers microscope cameras for laboratory, biological, industrial, educational, and digital imaging applications.
Explore:
Including camera solutions for:
CMOS imaging
CCD imaging
HDMI output
USB imaging
USB3.0 imaging
Wi-Fi connectivity
C-mount systems
Cooled scientific imaging
For integration with trinocular microscopes, stereo microscopes, industrial optical systems, and digital imaging platforms.
Need help matching the camera, sensor, C-mount adapter, and microscope?
Contact MicroscopeX for complete imaging system configuration support.