When choosing a microscope camera, resolution and sensor size often receive most of the attention.
But the camera interface can have just as much impact on how the microscope feels to use.
Two cameras may use similar sensors and produce similar image quality, yet provide completely different workflows depending on whether they connect through:
HDMI
USB
USB3.0
Or a combination of multiple interfaces
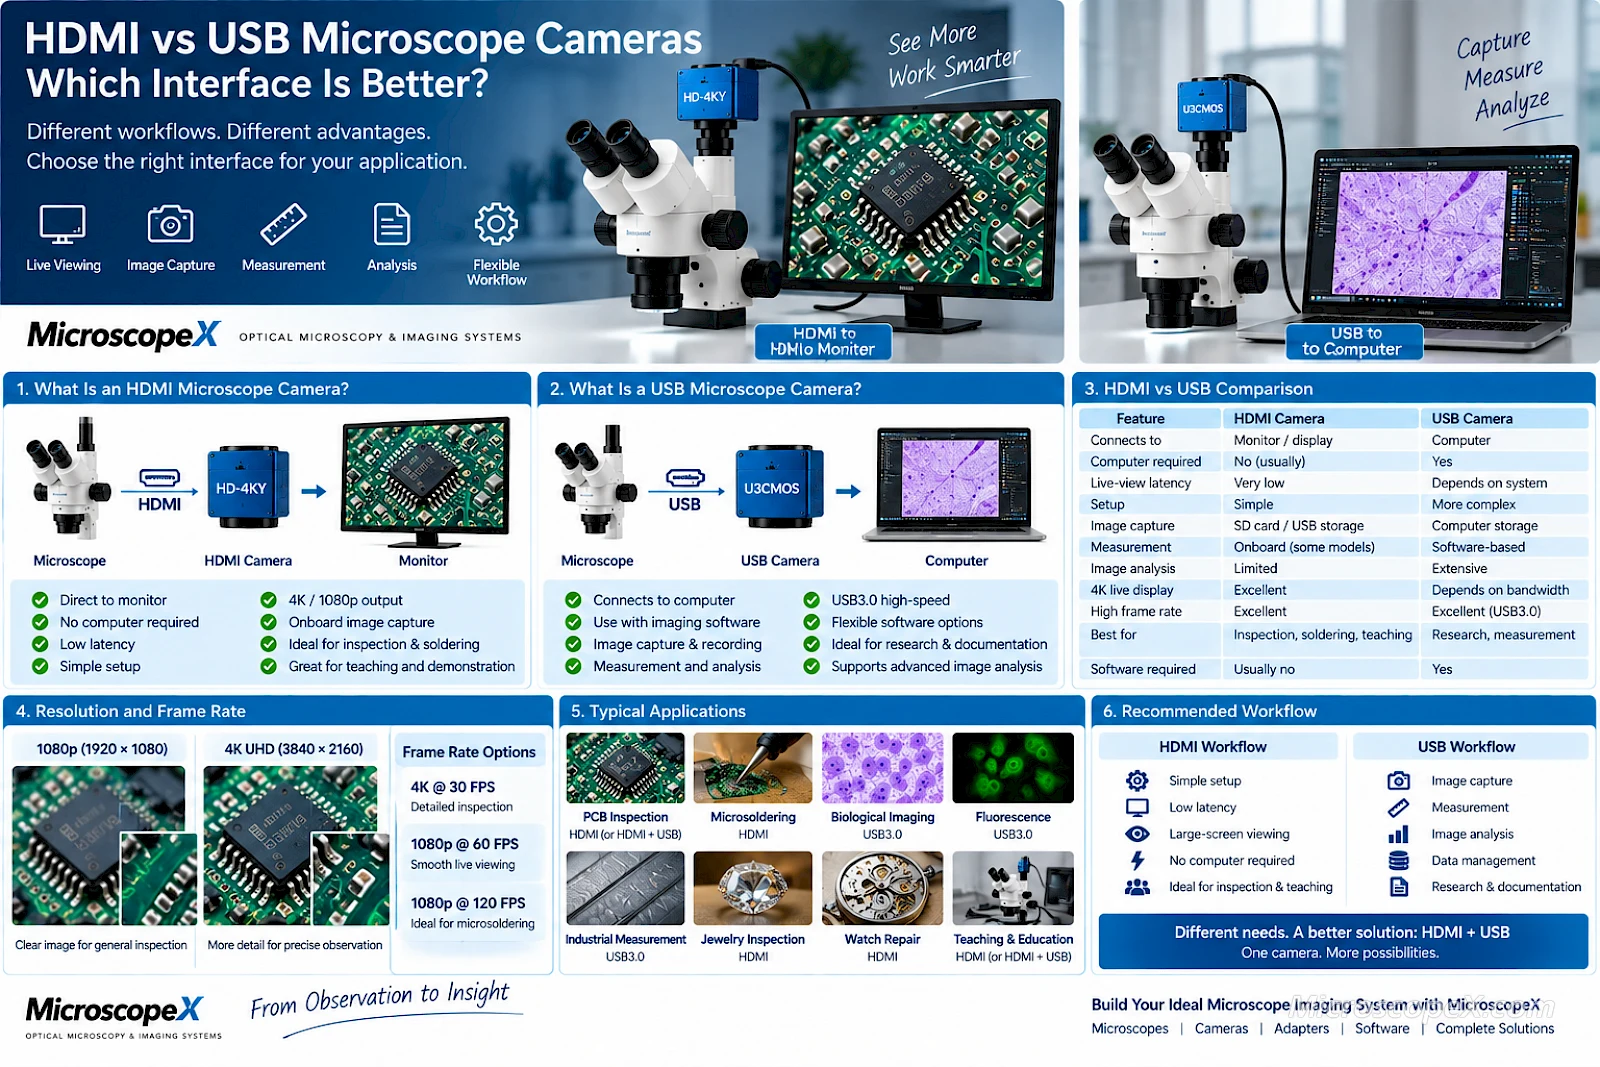
An HDMI microscope camera can usually send the image directly to a monitor without requiring a computer.
A USB microscope camera normally sends its image to a computer, where imaging software provides capture, measurement, annotation and analysis.
Neither interface is universally better.
The right choice depends on what you need to do.
For example:
Microsoldering often benefits from fast, low-latency HDMI viewing.
Biological documentation often benefits from USB software and image management.
Industrial measurement may require USB3.0 and calibrated software.
Teaching can benefit from the simplicity of HDMI.
A multipurpose laboratory may benefit from a camera that provides both HDMI and USB.
This guide explains the differences between HDMI and USB microscope cameras and helps you select the right interface for your application.
You can browse the complete Microscope Camera range from MicroscopeX.
What Is an HDMI Microscope Camera?
An HDMI microscope camera sends digital video directly to a compatible display.
The basic configuration is:
Microscope → HDMI Camera → Monitor
A computer is not required for basic live observation.
Depending on the camera, control may be provided through:
Buttons
Remote control
USB mouse
On-screen menus
Embedded camera software
Some HDMI microscope cameras also provide internal functions such as:
Image capture
Video recording
Measurement
Crosshairs
Digital zoom
White balance
Exposure control
Freeze frame
Image comparison
Images and videos may be stored on:
SD card
TF card
USB flash drive
depending on the camera.
What Is a USB Microscope Camera?
A USB microscope camera sends image data to a computer.
The basic workflow is:
Microscope → USB Camera → Computer → Imaging Software
The computer handles:
Live image display
Image capture
Video recording
Exposure settings
White balance
Measurement
Calibration
Annotation
Image processing
File storage
Analysis
USB microscope cameras are therefore especially useful when the digital workflow depends on software.
HDMI vs USB at a Glance
| Feature | HDMI Camera | USB Camera |
|---|---|---|
| Main destination | Monitor | Computer |
| Computer required | No | Yes |
| Setup complexity | Low | Moderate |
| Live viewing | Excellent | Excellent |
| Latency | Often very low | Depends on camera/computer |
| Measurement | Often built-in on advanced models | Usually software-based |
| Image analysis | Limited to camera functions | Extensive |
| File management | SD/TF/USB storage | Computer storage |
| Software integration | Limited or optional | Strong |
| Teaching | Excellent | Excellent |
| Microsoldering | Excellent | Good to excellent |
| Biological documentation | Good | Excellent |
| Industrial measurement | Good | Excellent |
| Long-term data workflow | Moderate | Excellent |
This table provides a useful starting point, but the differences become clearer when each factor is considered individually.
1. HDMI Is Designed for Direct Viewing
The main advantage of HDMI is simplicity.
You can often connect the microscope camera directly to:
Computer monitor
Television
Projector
4K display
and immediately see the microscope image.
The system becomes:
Microscope → Camera → Screen
There is no need to:
Boot a computer
Open imaging software
Install camera drivers
Configure USB bandwidth
Manage computer display windows
For inspection stations, teaching systems and electronics benches, this simplicity can be extremely valuable.
Why HDMI Feels Natural for Microscope Work
Traditional microscopes provide immediate optical feedback.
When you move the specimen, the image moves immediately.
When digital imaging replaces the eyepieces, the camera-display system should ideally feel similarly responsive.
A good HDMI system can provide:
Smooth live video
Low latency
Fast response
Full-screen display
This is one reason HDMI cameras are popular for real-time manipulation.
2. USB Is Designed for Computer-Based Imaging
USB takes a different approach.
Instead of treating the monitor as the final destination, USB sends camera data into a computer.
The computer becomes part of the microscope system.
This makes it possible to perform more sophisticated tasks.
Typical USB imaging functions include:
Capture
Measurement
Calibration
Annotation
Image stitching
Extended depth of field
Counting
Segmentation
Reporting
Image processing
If your work continues after the image is captured, USB often provides the stronger workflow.
3. Latency: One of the Biggest Differences
Latency is the delay between something happening beneath the microscope and appearing on the screen.
For example:
You move a pair of tweezers.
If the display shows the movement almost immediately, latency is low.
If the image noticeably follows your hand, latency is high.
This matters enormously for:
Microsoldering
Microdissection
Fine manipulation
Assembly
PCB rework
Watch repair
Why HDMI Often Has Lower Practical Latency
In a standalone HDMI system, the signal path can be relatively direct:
Sensor → Camera Processor → HDMI → Monitor
In a USB system, the path may involve:
Sensor → Camera → USB → Driver → Computer → Imaging Software → GPU → Display
Every stage can potentially add delay.
This does not mean all USB cameras are slow.
A well-designed USB3.0 system running on a good computer can provide very responsive imaging.
But HDMI generally offers a simpler route for direct live viewing.
Latency Depends on the Complete System
Do not judge latency from the interface alone.
The final delay can depend on:
Camera processing
Camera resolution
FPS
USB bandwidth
Computer performance
Imaging software
Graphics processing
Monitor image processing
Monitor refresh rate
Even an HDMI camera can feel slow if connected to a television using heavy image processing.
For precision work, the complete signal chain matters.
4. Frame Rate Matters for Both HDMI and USB
Frame rate is measured in frames per second, or FPS.
Typical values include:
30 FPS
60 FPS
120 FPS
Higher FPS produces smoother movement.
For static specimens, 30 FPS may be entirely sufficient.
For hand manipulation, 60 FPS or more can feel significantly better.
Example: Resolution vs Frame Rate
A microscope camera may support:
4K at 30 FPS
and:
1080p at 60 FPS
or even:
1080p at 120 FPS
The high-resolution mode is excellent for detailed inspection.
The high-frame-rate mode is excellent for active work.
This is exactly the type of flexibility provided by cameras such as the HD-4KY, which supports 4K HDMI output while also providing high-frame-rate 1080p modes.
HDMI Is Particularly Strong for Microsoldering
Microsoldering requires continuous hand-eye coordination.
You are simultaneously:
Moving the soldering iron
Positioning tweezers
Applying solder
Adjusting components
Watching solder flow
Any noticeable delay between hand movement and screen response can reduce precision.
For this reason, a typical screen-based soldering system may prioritize:
Low latency
High FPS
Wide field of view
Good color
Sufficient resolution
rather than maximum megapixel count.
Recommended HDMI Microsoldering Workflow
A useful configuration is:
Stereo Microscope
↓
↓
HDMI Camera
↓
Low-Latency Monitor
For detailed inspection:
4K / 30 FPS
may be excellent.
For active tool movement:
1080p / 60 FPS or higher
may feel smoother.
5. HDMI Is Excellent for Standalone Operation
A major advantage of HDMI is independence from a computer.
This is useful in environments such as:
Repair benches
Manufacturing lines
Classrooms
Jewelry inspection
Service centers
Quality-control stations
The operator can switch on the microscope, camera and monitor and begin working.
This reduces the number of components required.
Standalone HDMI System Advantages
A standalone system can be:
Easier to maintain
Faster to start
More reliable
Simpler for multiple users
Less dependent on operating-system updates
Less vulnerable to software configuration problems
For production environments, simplicity can be a major advantage.
6. USB Is Better for Image Management
If your microscopy workflow produces many images, USB becomes extremely useful.
Images can be stored directly on the computer and organized by:
Sample
Customer
Date
Batch
Experiment
Part number
Inspection record
This makes USB especially useful for:
Laboratories
Quality control
Research
Medical documentation
Materials analysis
The computer becomes both the imaging device and the image archive.
7. USB Is Better for Measurement
Measurement is one of the strongest reasons to use a computer-connected microscope camera.
Imaging software can calibrate the camera so pixel dimensions correspond to real dimensions.
Measurements may include:
Length
Width
Diameter
Radius
Angle
Area
Perimeter
A calibration slide or stage micrometer is normally used to establish scale.
Why Computer Measurement Is Powerful
Computer-based measurement allows:
Multiple calibration profiles
Saved results
Annotations
Exported reports
Repeat measurements
Data management
This makes USB cameras particularly useful in industrial quality control.
Can HDMI Cameras Measure Too?
Yes.
Many advanced HDMI cameras include built-in measurement tools.
These may provide:
Lines
Angles
Circles
Rectangles
Crosshairs
Calibration
The camera interface can often be controlled using a USB mouse.
This makes it possible to perform basic measurement without a computer.
However, a computer usually provides a more powerful environment for:
Complex analysis
Data management
Reporting
Batch processing
8. USB2.0 vs USB3.0
Not all USB interfaces provide the same performance.
This is particularly important in microscopy.
USB2.0
USB2.0 is widely compatible and works well for many lower-data-rate imaging applications.
It remains useful for:
Education
Routine biological imaging
Still-image capture
Moderate-resolution cameras
Cost-sensitive systems
MicroscopeX offers several USB2.0 C-mount camera families through the C-Mount Camera range.
USB3.0
USB3.0 provides much greater available bandwidth.
This is important when transmitting:
High-resolution images
Larger sensor data
Higher FPS
High-bit-depth images
For demanding microscopy, USB3.0 is often preferable.
The U3CMOS Series provides C-mount USB3.0 cameras designed for higher-speed acquisition and computer-based measurement.
Why USB3.0 Matters at High Resolution
A 4K image contains approximately:
8.29 million pixels
Each frame contains significantly more data than a 1080p frame.
As resolution and frame rate increase, the required data rate rises rapidly.
USB3.0 provides more bandwidth for this type of imaging.
9. HDMI Resolution Depends on the Display
An HDMI microscope camera may support:
1080p
4K
But the monitor must support the same resolution.
For example:
4K Camera + 1080p Monitor
cannot display native 4K resolution.
To see the full benefit of:
3840 × 2160
you need a compatible 4K display.
Monitor Refresh Rate Matters Too
Suppose a camera outputs:
1080p at 120 FPS
but the monitor supports only:
60 Hz
The display cannot visually present 120 completely distinct frames each second in the same way a 120 Hz display can.
The camera and monitor should therefore be selected together.
10. USB Resolution Depends on the Computer
USB imaging depends on computer performance.
The computer must process:
Camera data
Live display
Image processing
Measurement overlays
Recording
High-resolution cameras place greater demands on:
CPU
RAM
USB controller
Storage
GPU
A slow computer can make an otherwise good camera feel unresponsive.
Avoid USB Hubs for Demanding Cameras
High-bandwidth microscope cameras may work best when connected directly to a USB port on the computer.
Some hubs share bandwidth between multiple devices.
This can reduce:
Maximum FPS
Stability
Data throughput
For demanding USB3.0 imaging, use a suitable direct connection whenever possible.
11. Driver and Software Compatibility
HDMI cameras normally require no operating-system driver for direct monitor use.
USB cameras typically depend on:
Device driver
Imaging software
Operating system
Before selecting a USB camera, check compatibility with:
Windows
macOS
Linux
where appropriate.
MicroscopeX provides compatible packages through the Software & Drivers section.
UVC-Compatible Cameras
Some microscope cameras support the standard USB Video Class, or UVC.
This can improve compatibility with operating systems and third-party applications.
However, advanced functions may still require dedicated software.
For example, camera-specific software may provide:
Measurement
EDF
Stitching
Calibration
HDR
Image stacking
that generic video applications cannot access.
12. HDMI Is Excellent for Teaching
For classroom microscopy, HDMI provides a very simple workflow:
Microscope → Camera → Large Monitor or Projector
Students can immediately see the specimen.
This is useful for:
Biology
Materials science
Electronics
Gemology
Demonstration
Group discussion
No individual student needs to look through the eyepieces.
Why 4K Is Useful in Teaching
A 4K image can look especially good on a large classroom display.
It allows fine details to remain clear when shown to a group.
The XCAMLITE4K is one example of a MicroscopeX camera designed with 4K HDMI/USB output and teaching or demonstration applications in mind.
USB Is Also Useful for Teaching
USB offers another advantage:
The instructor can capture and save images directly to a computer.
This makes it easier to:
Annotate specimens
Save examples
Prepare lessons
Compare samples
Create teaching materials
Therefore, teaching environments can benefit greatly from a dual-interface camera.
13. USB Is Strong for Biological Imaging
Biological microscopy frequently requires more than live viewing.
Typical workflows include:
Image capture
Sample documentation
Measurement
Annotation
Comparison
Archiving
A USB camera connected to imaging software is therefore a natural fit.
Biological USB Workflow
A typical setup is:
↓
Trinocular Port
↓
↓
USB3.0 Camera
↓
Computer
↓
Imaging Software
This provides a complete documentation environment.
14. Fluorescence Imaging Usually Favors Computer-Based Cameras
Fluorescence microscopy often requires:
Long exposures
High sensitivity
Low noise
Cooling
High dynamic range
Quantitative analysis
These applications generally benefit from computer-based camera control.
The interface may still be USB3.0 or another scientific connection.
The key point is that scientific fluorescence imaging typically depends much more heavily on software than standalone HDMI observation.
15. Industrial Inspection Can Use Either
Industrial microscopy covers a broad range of applications.
For visual inspection:
HDMI may be ideal.
For quantitative measurement:
USB may be ideal.
For mixed workflows:
HDMI + USB can be ideal.
Example: Production-Line Visual Inspection
Requirements:
Fast startup
Full-screen image
Minimal interaction
Simple operation
Recommended:
HDMI
Example: Dimensional Inspection
Requirements:
Calibration
Measurements
Saved results
Documentation
Recommended:
USB3.0
Example: Inspection + Reporting
Requirements:
Live monitor
Measurement
Documentation
Recommended:
HDMI + USB
16. Multi-Interface Cameras Solve the Either/Or Problem
You do not necessarily need to choose between HDMI and USB.
Many modern microscope cameras provide both.
MicroscopeX currently offers several multi-interface systems, including cameras supporting combinations such as:
HDMI + USB
HDMI + USB3.0
HDMI + USB + LAN
HDMI + USB + Wi-Fi
This allows one camera to support multiple workflows.
Example: HDMI + USB Workflow
Connect:
HDMI → Monitor
for:
Live inspection
Full-screen viewing
Low-latency work
while connecting:
USB → Computer
for:
Capture
Measurement
Analysis
This is one of the most flexible microscope-camera configurations.
ALPHA1080 Example
The ALPHA1080 Series combines:
HDMI
USB2.0
SD-card storage
Its HDMI mode supports standalone display and embedded control functions, while USB mode provides access to more advanced computer-based image processing.
This illustrates why multi-interface cameras can be useful when a microscope serves more than one purpose.
XCAMLITE4K Example
The XCAMLITE4K combines:
C-mount
4K HDMI
USB
SD storage
Embedded camera control
For HDMI output it can provide native 4K display, while USB provides computer connectivity.
This type of camera is useful for:
Teaching
Inspection
Documentation
AFCUH Example
The AFCUH provides HDMI and USB modes along with features including:
Autofocus
Measurement
Calibration
Extended depth of field
It demonstrates how modern microscope cameras increasingly blur the traditional distinction between standalone HDMI and computer-based USB imaging.
17. HDMI vs USB for PCB Inspection
For PCB inspection, both can work well.
But their strengths differ.
HDMI
Best when you need:
Large live image
Low latency
Simple operation
Fast inspection
USB
Best when you need:
Saved inspection images
Measurement
Reporting
Annotation
HDMI + USB
Best when you need both.
HDMI vs USB for Microsoldering
For active microsoldering:
HDMI usually has the advantage.
The priorities are:
Low latency
High FPS
Smooth tool movement
Large display
USB may still be useful for documentation, but it is often secondary during the actual soldering operation.
HDMI vs USB for Biological Microscopy
For routine visual teaching:
HDMI is excellent.
For scientific documentation:
USB is usually more powerful.
The ideal system depends on whether the microscope is primarily used to:
observe
or:
capture and analyze
HDMI vs USB for Industrial Measurement
For serious measurement and reporting:
USB3.0 is generally the stronger option.
Computer software provides:
Calibration profiles
Measurement tools
Data storage
Export
Reporting
Advanced HDMI cameras may perform basic measurement, but computer-based workflows provide greater flexibility.
HDMI vs USB for Jewelry and Gemstones
HDMI is especially attractive for:
Large-screen inspection
Customer demonstration
Surface evaluation
Training
USB becomes useful when images must be:
Saved
Annotated
Compared
Documented
A dual-interface camera is often ideal.
HDMI vs USB for Research
Research applications frequently require:
Repeatable camera control
Data storage
Image analysis
Quantitative processing
USB or USB3.0 therefore tends to be more suitable.
However, HDMI can still be useful as an additional live display.
18. Image Capture and Recording
Both HDMI and USB cameras can capture images.
The difference is usually where the data is stored.
HDMI Storage
Standalone cameras may save to:
SD card
TF card
USB flash drive
Advantages:
No computer required
Simple
Portable
Limitations:
Manual file transfer
Less integrated data management
USB Storage
Images can be saved directly to:
SSD
Hard drive
Network storage
Laboratory server
Advantages:
Easier organization
Immediate file naming
Backup
Database integration
Large storage capacity
For high-volume imaging, computer storage is usually more practical.
19. Video Recording
Recording requirements can affect interface choice.
4K video produces substantial amounts of data.
For standalone HDMI cameras, recording may depend on:
Camera encoding
SD/TF card speed
Storage capacity
For USB cameras, recording depends on:
Computer performance
Storage speed
Software
USB bandwidth
If long-duration recording is important, evaluate the complete data path.
20. Camera Controls
HDMI cameras often provide camera controls directly on-screen.
Typical functions include:
Exposure
Gain
White balance
Sharpness
Saturation
Zoom
Freeze
Crosshair
Advanced cameras may allow a USB mouse to control the interface.
USB Camera Controls
USB imaging software can offer more extensive controls, including:
Exposure
Gain
White balance
Bit depth
ROI
Measurement
Histogram
Image processing
Recording settings
The exact options depend on the camera and software.
21. Measurement Calibration
If you perform measurements, calibration is essential.
A microscope image does not inherently know real-world dimensions.
The system must be calibrated using a known scale.
Typical calibration tools include:
Stage micrometer
Calibration slide
Calibration values depend on:
Microscope magnification
Zoom setting
Objective
Camera adapter
Sensor
Output resolution
Changing the optical configuration may require recalibration.
22. What About Wi-Fi and Ethernet?
HDMI and USB are not the only options.
Some microscope cameras also support:
Wi-Fi
Ethernet
Gigabit Ethernet
Wi-Fi
Advantages:
Wireless viewing
Tablet connectivity
Flexible classroom use
Limitations:
Potential latency
Wireless congestion
Less predictable performance
Wi-Fi is useful for sharing.
It is usually not the first choice for precision microsoldering.
Ethernet
Advantages:
Longer cable distances
Network integration
Stable industrial connection
Remote operation
Ethernet can be useful for:
Production systems
Machine vision
Remote monitoring
Some multi-interface microscope cameras combine HDMI, USB, Wi-Fi and Ethernet in one unit.
23. HDMI vs USB: Cost Considerations
Camera cost depends on much more than interface.
Factors include:
Sensor
Resolution
FPS
Image processor
Software
Measurement functions
Storage
Multi-interface capability
A USB camera may appear less expensive but require:
Computer
Monitor
Software environment
An HDMI camera may require:
Dedicated monitor
Compare the total system cost rather than camera price alone.
24. Reliability and Maintenance
A standalone HDMI system has fewer software dependencies.
This can be useful for:
Workshops
Manufacturing
Shared workstations
USB systems depend more on:
Operating system
Driver
Software
But they offer far greater analytical flexibility.
The best choice depends on whether simplicity or functionality has higher priority.
HDMI vs USB Selection Table
| Application | HDMI | USB | Best Choice |
|---|---|---|---|
| Microsoldering | ★★★★★ | ★★★☆☆ | HDMI |
| PCB live inspection | ★★★★★ | ★★★★☆ | HDMI / Both |
| PCB documentation | ★★★★☆ | ★★★★★ | Both |
| Biological observation | ★★★★☆ | ★★★★★ | USB |
| Biological teaching | ★★★★★ | ★★★★☆ | HDMI / Both |
| Fluorescence research | ★★☆☆☆ | ★★★★★ | USB |
| Industrial measurement | ★★★☆☆ | ★★★★★ | USB |
| Jewelry inspection | ★★★★★ | ★★★★☆ | HDMI / Both |
| Classroom display | ★★★★★ | ★★★★☆ | HDMI |
| Image analysis | ★★☆☆☆ | ★★★★★ | USB |
| Long-term archiving | ★★★☆☆ | ★★★★★ | USB |
Which Interface Should You Choose?
A simple decision process can help.
Choose HDMI If:
You want to connect directly to a monitor
You do not want to use a computer
Low latency is important
You perform microsoldering
You perform live PCB inspection
You teach using a large screen
You want a simple workstation
Choose USB If:
You need image-analysis software
You perform measurements
You need calibrated data
You need organized image storage
You perform biological imaging
You perform research
You need advanced processing
Choose HDMI + USB If:
You want live monitor viewing and computer analysis
The microscope has multiple users
You perform both inspection and documentation
You want the most flexible workstation
Your application may change over time
For many professional systems, this is the best long-term option.
Common Buying Mistakes
Mistake 1: Assuming HDMI Always Means Low Latency
HDMI can provide excellent low-latency viewing, but camera processing and monitor processing still matter.
Mistake 2: Assuming USB Is Always Slow
A good USB3.0 camera on a suitable computer can provide excellent real-time performance.
Mistake 3: Comparing Interfaces Without Comparing FPS
Always check:
Resolution + FPS + interface
together.
Mistake 4: Buying 4K HDMI for a 1080p Monitor
You cannot display the complete native 4K image on a 1080p screen.
Mistake 5: Ignoring the Computer Specification
High-resolution USB cameras require sufficient computer performance.
Mistake 6: Ignoring Software Compatibility
Check supported:
Operating systems
Drivers
Software
before purchasing.
Mistake 7: Choosing HDMI When You Really Need Analysis
Built-in HDMI tools are convenient, but a computer usually provides more powerful analysis.
Mistake 8: Choosing USB When You Only Need Live Viewing
If all you need is a clean image on a large screen, HDMI may create a much simpler system.
Mistake 9: Forgetting the Camera Adapter
The interface does not determine the optical field of view.
Sensor size and the C-mount adapter still need to be correctly matched.
Quick Buying Checklist
Before selecting HDMI or USB, ask:
Do I need a computer?
If no:
HDMI
Do I perform live hand manipulation?
If yes:
Prioritize:
HDMI + high FPS + low latency
Do I need measurements?
If yes:
USB / USB3.0
or a suitable HDMI camera with built-in measurement.
Do I need advanced image analysis?
If yes:
USB
Do I need a large classroom display?
If yes:
HDMI
Do I need both live viewing and analysis?
If yes:
HDMI + USB
Do I need 4K?
If yes:
Check:
Camera output
Interface
Monitor
FPS
together.
Do I need high-speed imaging?
If yes:
Check:
USB3.0 bandwidth
HDMI frame rate
Sensor readout
Computer
Display refresh rate
Frequently Asked Questions
Is HDMI better than USB for a microscope camera?
Not universally.
HDMI is usually better for simple, low-latency monitor viewing.
USB is usually better for software-based capture, measurement and analysis.
Which is better for microsoldering?
HDMI is generally preferable because low-latency, high-frame-rate direct viewing is particularly important during tool manipulation.
Which is better for biological microscopy?
USB is usually more useful for documentation, measurement and analysis.
HDMI can still be excellent for classroom observation and demonstration.
Can a microscope camera have both HDMI and USB?
Yes.
Many modern microscope cameras provide both interfaces.
This allows direct monitor viewing and computer-based image processing from the same camera.
Do I need a computer for an HDMI microscope camera?
Not for basic standalone operation.
A compatible monitor is normally sufficient.
Some HDMI cameras include built-in image capture, measurement and storage functions.
Do I need software for a USB microscope camera?
Usually yes.
The camera typically requires a driver or UVC support and imaging software for viewing, capture and analysis.
Is USB3.0 better than USB2.0?
For high-resolution or high-frame-rate imaging, USB3.0 generally provides greater bandwidth.
USB2.0 remains suitable for many routine microscopy applications.
Is HDMI faster than USB3.0?
There is no simple universal answer because the interfaces serve different workflows.
Practical responsiveness depends on:
Camera
Resolution
FPS
Processing
Computer
Monitor
HDMI often provides a simpler direct path for standalone live viewing.
Can HDMI cameras perform measurements?
Many advanced models can.
However, computer-based USB software usually provides more powerful measurement, reporting and image-analysis features.
Should I buy HDMI or USB for PCB inspection?
For purely visual PCB inspection:
HDMI is excellent.
For measurement and documentation:
USB is useful.
For professional mixed workflows:
HDMI + USB is often ideal.
Conclusion
HDMI and USB microscope cameras are not competing solutions so much as two different approaches to digital microscopy.
HDMI is optimized for direct observation.
It excels at:
Live viewing
Low-latency operation
Microsoldering
PCB inspection
Teaching
Standalone workstations
USB is optimized for computer-based imaging.
It excels at:
Image capture
Measurement
Calibration
Analysis
Research
Documentation
File management
For many professional users, the most versatile solution is neither HDMI nor USB alone.
It is a multi-interface microscope camera that supports both.
This allows you to use:
HDMI for immediate live viewing
and:
USB for capture, measurement and analysis
from the same microscope system.
As with every microscope camera decision, the interface should not be selected in isolation.
Consider the complete workflow:
Microscope + Camera Adapter + Sensor + Resolution + FPS + Interface + Monitor + Computer + Software
The best interface is the one that removes friction from the work you actually need to perform.
Explore HDMI and USB Microscope Cameras
Explore MicroscopeX digital imaging systems:
Need help choosing HDMI, USB, USB3.0 or a multi-interface camera?
Contact MicroscopeX for complete microscope imaging system configuration support.