How to Get Better Images with an Optical Microscope: Practical Optimization Techniques
Many microscope users assume that poor image quality is caused by the instrument itself. In reality, most imaging problems come from incorrect setup, improper lighting, or lack of optimization.
This guide focuses on practical techniques to improve image clarity, contrast, and detail—without changing equipment.
1. What Defines a High-Quality Microscope Image?
A good microscope image is not just magnified—it is informative and precise.
Key characteristics include:
- Sharp focus across the field
- Even illumination
- Good contrast between structures
- Minimal glare or shadows
- Accurate color representation
- Clear separation of fine details
If any of these elements are missing, the image quality is compromised.
2. Start with Proper Illumination
Lighting is the most underestimated factor in microscopy.
Avoid Maximum Brightness
Using full light intensity often reduces contrast and washes out fine structures.
Instead:
- Start with moderate brightness
- Increase only when necessary
- Let contrast guide your adjustment, not brightness
Adjust the Light Path
Ensure:
- Light is centered
- No obstruction in the optical path
- Filters (if used) are correctly positioned
Even slight misalignment can reduce image quality.
3. Master the Condenser Adjustment
The condenser plays a critical role in resolution and contrast.
Correct Condenser Height
- For high magnification (40× and above): condenser should be close to the slide
- For low magnification: slightly lower position may improve contrast
Centering the Condenser
If your microscope allows centering:
- Align the condenser with the optical axis
- This ensures even illumination across the field
Misalignment leads to uneven brightness and loss of detail.
4. Optimize the Iris Diaphragm
The iris diaphragm controls both light intensity and angular distribution.
Common Mistake: Fully Open Diaphragm
A fully open diaphragm:
- Increases brightness
- Reduces contrast
- Makes transparent structures harder to see
Practical Adjustment Method
- Close the diaphragm gradually
- Stop when contrast improves but image remains sharp
- Avoid over-closing (which reduces resolution)
A properly adjusted diaphragm significantly improves visibility of fine structures.
5. Use Correct Objective Lens Techniques
Clean Before Use
Even a small amount of oil or dust can:
- Reduce resolution
- Introduce haze
- Create light scattering
Always inspect the objective before observation.
Respect Working Distance
High-magnification objectives have very short working distances.
- Move slowly when focusing
- Never force contact with the slide
Use the Right Objective for the Task
Do not overuse high magnification.
Often:
- 10× or 40× gives better overall clarity
- 100× should be used only when necessary
6. Achieve Proper Focus
Use Coarse and Fine Focus Correctly
- Coarse focus: only for low magnification
- Fine focus: for final adjustment and high magnification
Focus Through the Sample
Instead of stopping at the first visible layer:
- Slowly move through different focal planes
- Identify the layer with the most useful detail
This is especially important for thick or uneven samples.
7. Improve Contrast Without Changing Equipment
Adjust Illumination First
Before using advanced techniques:
- Reduce brightness slightly
- Adjust diaphragm
- Optimize condenser
Use Staining When Appropriate
Transparent samples often lack contrast.
Staining can:
- Highlight structures
- Increase visibility
- Improve differentiation
Reduce Background Noise
- Clean slides thoroughly
- Avoid air bubbles
- Use proper mounting techniques
8. Understand Depth of Field
Depth of field decreases as magnification increases.
This means:
- Only a thin layer is in focus at high magnification
- Slight focus changes reveal different structures
Practical Tip
At 100×:
- Use very fine adjustments
- Observe multiple focal layers
- Do not expect the entire sample to be sharp at once
9. Avoid Common Imaging Errors
Overexposure
Too much light:
- Removes contrast
- Masks fine details
- Creates glare
Underexposure
Too little light:
- Reduces visibility
- Increases noise
- Makes focusing difficult
Dirty Optics
Dust and oil cause:
- Blurry images
- Light scattering
- Dark spots
Misaligned Components
Improper alignment leads to:
- Uneven illumination
- Reduced resolution
- Eye strain
10. Optimize for Different Sample Types
Transparent Samples
- Reduce light intensity
- Partially close diaphragm
- Consider staining
Thick Samples
- Focus through layers
- Use lower magnification first
- Expect limited depth of field
Reflective or Opaque Samples
- Use reflected light setup (if available)
- Adjust angle of illumination
Live Samples
- Minimize light exposure
- Avoid overheating
- Use stable positioning
11. Camera and Digital Imaging Tips
If using a camera:
Match Exposure to the Eyepiece View
- Do not rely on automatic settings alone
- Adjust exposure manually if needed
Avoid Digital Overprocessing
- Excess sharpening creates artifacts
- Over-contrast hides real structures
Keep Sensor Clean
Dust on the sensor appears as fixed spots in images.
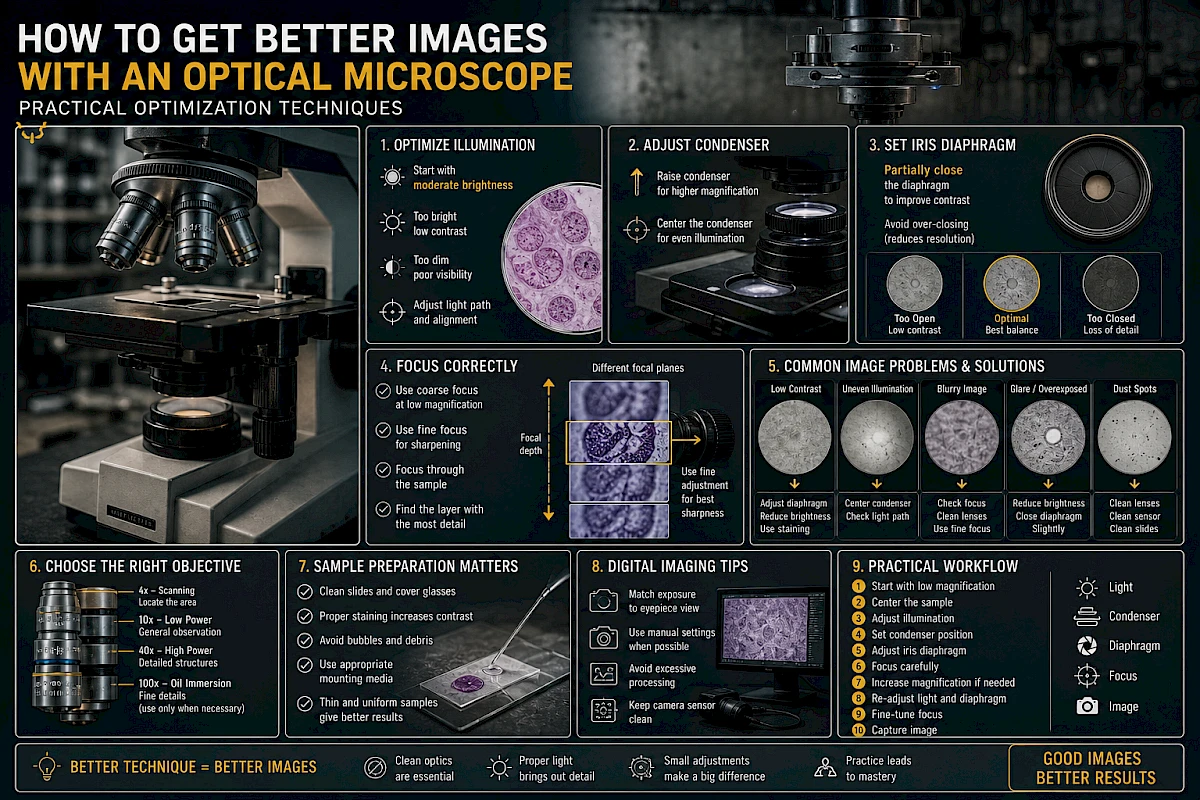
12. Practical Workflow for Best Results
A simple optimized workflow:
- Start with low magnification
- Center the sample
- Adjust light to moderate level
- Set condenser position
- Adjust iris diaphragm
- Focus carefully
- Increase magnification if needed
- Re-adjust light and diaphragm
- Fine-tune focus
- Capture image (if needed)
Consistency in workflow leads to consistent results.
13. Real-World Insight
In practice:
- Most image problems are solved by adjusting light and diaphragm
- Clean optics matter more than higher magnification
- Good technique can outperform expensive equipment
- Small adjustments often make the biggest difference
Conclusion
Improving microscope image quality is not about using more advanced equipment—it is about using the existing system correctly.
By mastering illumination, condenser settings, diaphragm control, and focusing technique, you can significantly improve clarity, contrast, and detail in every observation.
Precision in setup leads directly to precision in results.